
A Step-by-Step Guide to Saving Your Favorite LUTs in Adobe Premiere Pro

Introduction: Adobe Premiere Pro is a powerful tool for video editing, and Lumetri Color is a fantastic feature that allows you to enhance your footage with LUTs (Look-Up Tables). In this step-by-step guide, we'll show you how to save your favorite LUTs within Lumetri for quick and easy access in your video projects.
Step 1: Locate Your Adobe Premiere Pro Application

The first step is to find your Adobe Premiere Pro application on your computer. It's typically located in your Applications folder on macOS or in your Program Files on Windows.
Step 2: Right-Click and Choose "Show Package Contents" (macOS Only)

If you're using a Mac, you'll need to right-click on the Adobe Premiere Pro application and select "Show Package Contents." This step is not required for Windows users.
Step 3: Navigate to Lumetri Color

Once you've accessed the package contents (macOS) or if you're on Windows, navigate to the installation directory, you'll find a folder named "Lumetri." Open this folder to reveal its contents.
Step 4: Open the "LUTs" Folder

Within the Lumetri folder, locate the "LUTs" folder and open it. This is where Adobe Premiere Pro stores all the LUTs for its Lumetri Color panel.
Step 5: Access the "Technical" Folder
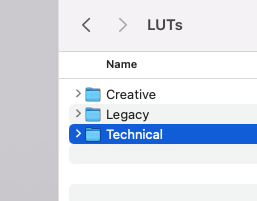
Inside the "LUTs" folder, you'll find several subfolders, including "Technical." Open the "Technical" folder to access the LUTs used for technical adjustments.
Step 6: Copy Your Favorite LUTs
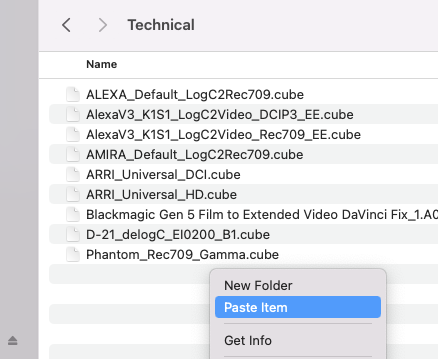
Here comes the fun part! Select and copy your favorite LUTs from your collection and paste them directly into the "Technical" folder. These LUTs could be ones you've downloaded or created yourself.
Step 7: Restart Adobe Premiere Pro
To ensure that Adobe Premiere Pro recognizes the newly added LUTs, it's a good practice to restart the application.
Step 8: Apply Your Favorite LUTs in Lumetri Color

Once Adobe Premiere Pro is up and running again, open your project and head to the Lumetri Color panel. You can find it in the "Color" workspace. In the Lumetri Color panel, click on the "Basic Correction" tab.
Step 9: Find Your Saved LUTs

Scroll down to the "Input LUT" section within the Basic Correction tab. You should now see your favorite LUTs listed among the available options. Click on any of them to apply it to your clip.
Step 10: Save Your LUT Preset (Optional)
If you'd like to keep your favorite LUTs neatly organized, you can create a custom LUT preset. After applying your chosen LUT, click the three-dot menu icon in the Lumetri Color panel, select "Save Preset," and follow the prompts to save your custom LUT preset with a name of your choice.
Conclusion: Saving your favorite LUTs in Adobe Premiere Pro's Lumetri Color panel is a straightforward process that can significantly speed up your video editing workflow. With just a few clicks, you'll have your preferred LUTs at your fingertips, ready to enhance your footage and give your projects a professional touch.